(Last Updated On: Feb 16, 2021)

I’m Boobalan, Author of this post, If you have any questions and clarifications regarding SEO, Contact me, I can guide you to become a Blogger in India.

You are here: Home/How to Start a Blog in India 2021

how to start a blog in india

In this guide, You are going to learn How to Start a Blog in India 2021 and make money out of it with this step by step guide we created for bloggers to use. 

The Internet is a place where many experiences, ideas, and content can be shared freely between people who are interested in similar topics. 

There is a wealth of information that can be retrieved from many other websites on the web. 

Alert:

“This blog would take 25 minutes to read it(4500 words). Yes, of course, it might EAT your time than expected, but I’m damn sure, once you completed reading this blog, you are ready to start a blog in India today!

Create a blog using A2Hosting(trusted by millions of customers) by following the guidelines below.”

If you are stuck in any step or questions, contact me, I can guide you on how to create a blog in India.”

The content on sites does not have to be videos, pictures, or products that are up for sale. It can also be your thoughts and expressions on various kinds of topics. Using blogs, share your knowledge with millions of internet users across the globe. 

Skip introduction part and go to step 1:

There is always a need for fresh perspectives and more knowledge. The blogs that you put out can give people a unique new look at the topics they are interested in and can enhance their understanding of the subject even more.

Ideally, you’d be helping people become more informed and well-versed in the topics that they are interested. Aside from that, also build up your business’ Internet presence or make money on the side. 

Knowing how to start a blog and make money in India is a unique way to create a passive income. While a new blog takes time to pick up, get money from blogging through a variety of blogging platforms.

There are lots of good reasons why you should start blogging. However, make sure that when you blog, do it with passion.

The first step on how to create a blog in India is first to understand what a blog is. A blog is a website that showcases mainly written or textual content.

How to Start a Blog in India

The content you post on a blog is known as a blog post. Many people and companies have blogs where they post regularly. 

As mentioned earlier, there is always a wealth of information to be shared, and blogs are an excellent way for people and companies to share the information and knowledge that they have.

A blog can be about anything under the sun that interests you. In case you are interested in automobiles, write about your passion for automobiles. Or in case you like fashion and clothes, write about it and post your articles for people with the same interests to read.

If you have a niche that you want to start blogging about, become one of the successful bloggers in India working on that niche. The same applies to business blogging.

To start a business blog, you require to write and share articles on your business field and your company so that consumers can see how much you know and how good you are at your job. People can also connect with you through your blogs.

A good thing about blogs is that they allow for connecting the reader and the writer/creator. People who have read blogs might leave comments to show that they are interested in what you are putting out and follow up with these people.

Blogs help you to build your network. So, it is suitable for both a personal and a business perspective as more contacts can mean more business for you. It is also an excellent way to show customers how committed you are to your service and that you value them and their input, which will lead them to also work more with you.

Learn how to start a blog in India in 2021 and make money in just five steps. It is more or less simple and should not take too much of your time.

How to Start a Blog in India and make $100 dollars in first month

Step 1. Pick a Domain Name(Blogging Niche)

Note: Same renewal price for buying a domain from Namecheap.

It is the first step to start a blog in India. Before choosing a name, you must first choose a niche for your new blog.

An excellent way to get to that is to first start by listing out the topics or niche of interest that the blog will cover. You could write about life experiences, hobbies, and passions, or even yourself.

Examples:
1. Travel 
2. Mom Blog
3. Finance
4. Beauty 
5. Fashion
6. Food
7. Video

It all depends on what niche you are most passionate around. Once you’ve decided on your topics and niche, begin to start throwing around ideas for your blog’s name. The name should be descriptive yet straightforward; complicated and drawn-out names can drive people away.

People should get attracted to blog after seeing its name. Use your niche in the name itself to get started. By seeing a niche they are interested in, people will want to visit your blog.

1. Choosing Domain Extension:

After creating a list of names comes the part of starting a blog where you require to select a domain name. Domains are essential for people to find you or share your blog. The “.org” is ideal for companies, but “.com” and “.net” can work for companies as well as personal blogs.

domain extension

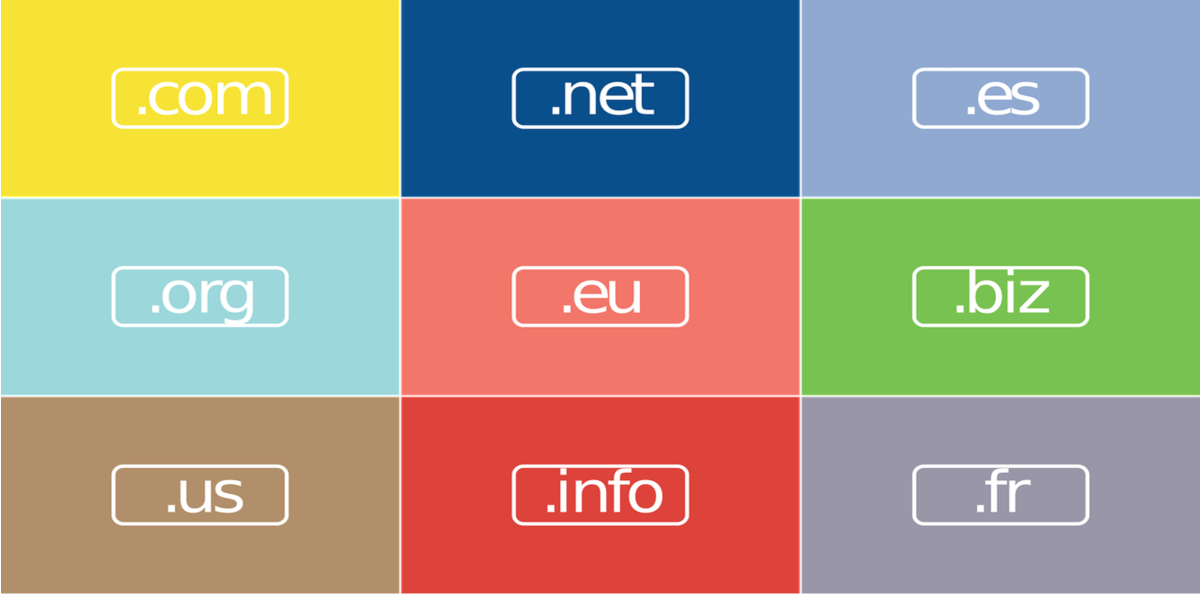
Also, use country-based domains such as “.in” for India and so on. However, the top 4 extensions for you to use are .com, .net, .co and .org. 

The cheapest one to use is .com, which has an average register/renewal price of Rs.673.38/yr. Those are the most affordable rates as well.

There are some rules to names that one must follow when creating your domain. One important rule is no spaces between words.

So, for example, you were going to be blogging about your personal life and called it “John’s Diary,” your domain name would need to be www.johnsdiary.com or something to that effect. 

It’s also a good idea to have different variations of your domain name in case the one you had in mind didn’t work.

Also, keep in mind that the only punctuation marks use in a domain name with dashes. Once you hold these in mind, It is easy to create a perfect domain for your blog.

2. Choosing Best Domain Register:

The next thing is to check the domain name availability. It may sound silly, but it is essential because you never know if someone else might be having the same name or idea as you.

Always remember that several people have a similar blog with the blog which you own. The domain name needs to be unique so that they stand out from the others and not get lost in the crowd.

The more unique your domain name is, the easier it will be for you to register it. 

In case you are having trouble getting the name you wanted, try a few things that can ensure that you get a suitable name for yourself. If the problem is with the extension, just use a different extension.

Eg., if .com is your extension and it is not available, use .org or .co, and so on. You quickly get more versions. Using smaller words like “my” or “the” in a blog and the domain name can also help. 

Another way to make a blog stand out is to use dashes. Once you’ve sorted this out, move on to getting a hosting account.

And many available registers are providing at the best price. These are some top registers in which choose from any one of them in the below.

  1. Namecheap
  2. Dynadot
  3. Namesilo
  4. Porkbun
  5. Godaddy

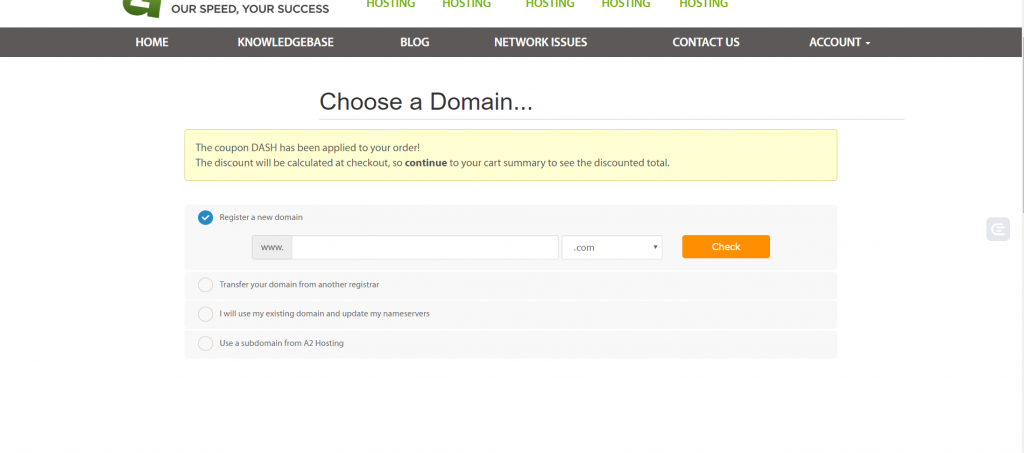
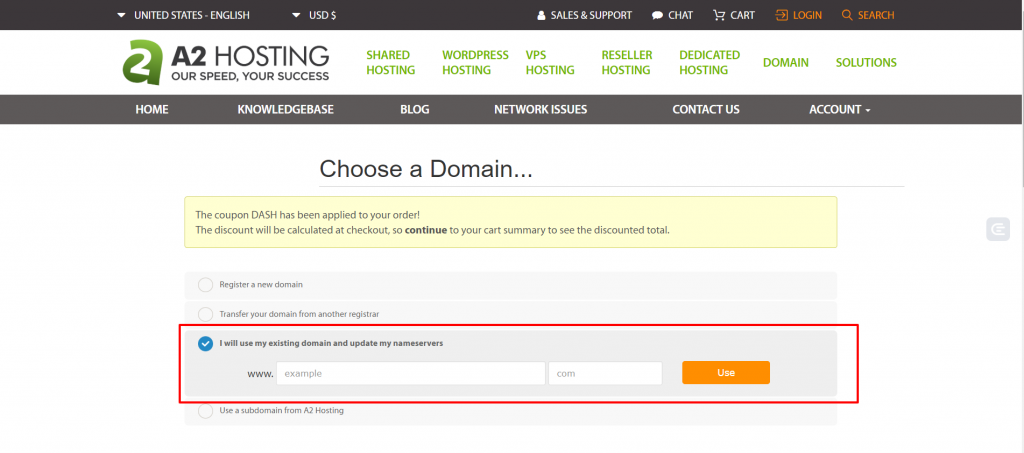
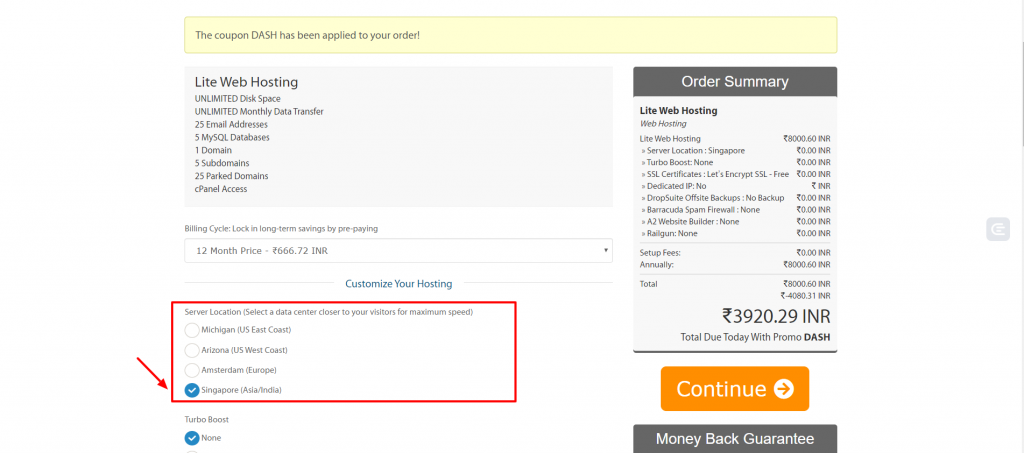
For example, if you are choosing NameCheap, enter your domain in search bar to check the availability like below,

Domain Name Registration Namecheap

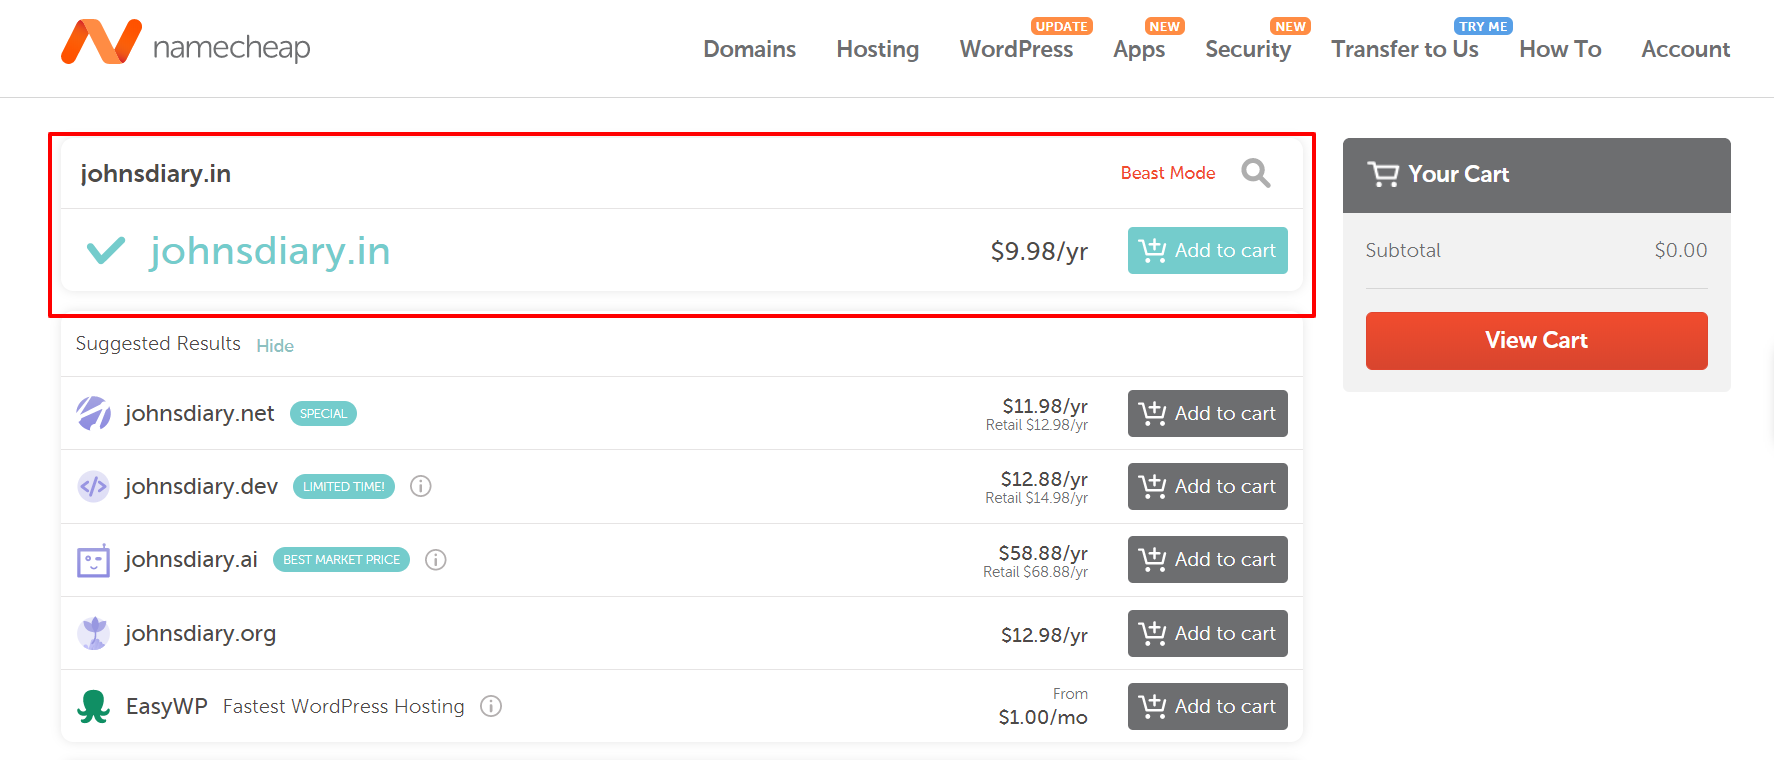
So here my domain name (Johnsdiary.in) is available, add this into the card.

In the next step, click on “View Cart.”

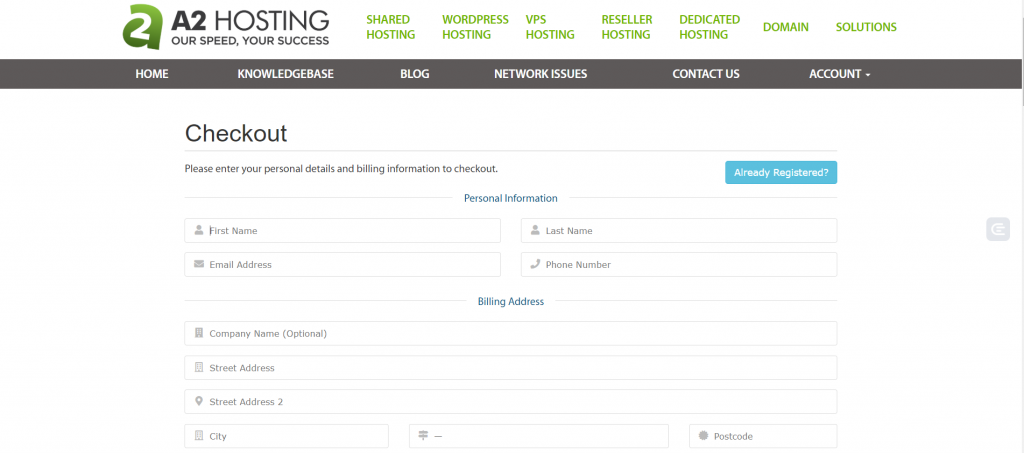
So in the next step, you must create an account in NameCheap to continue.

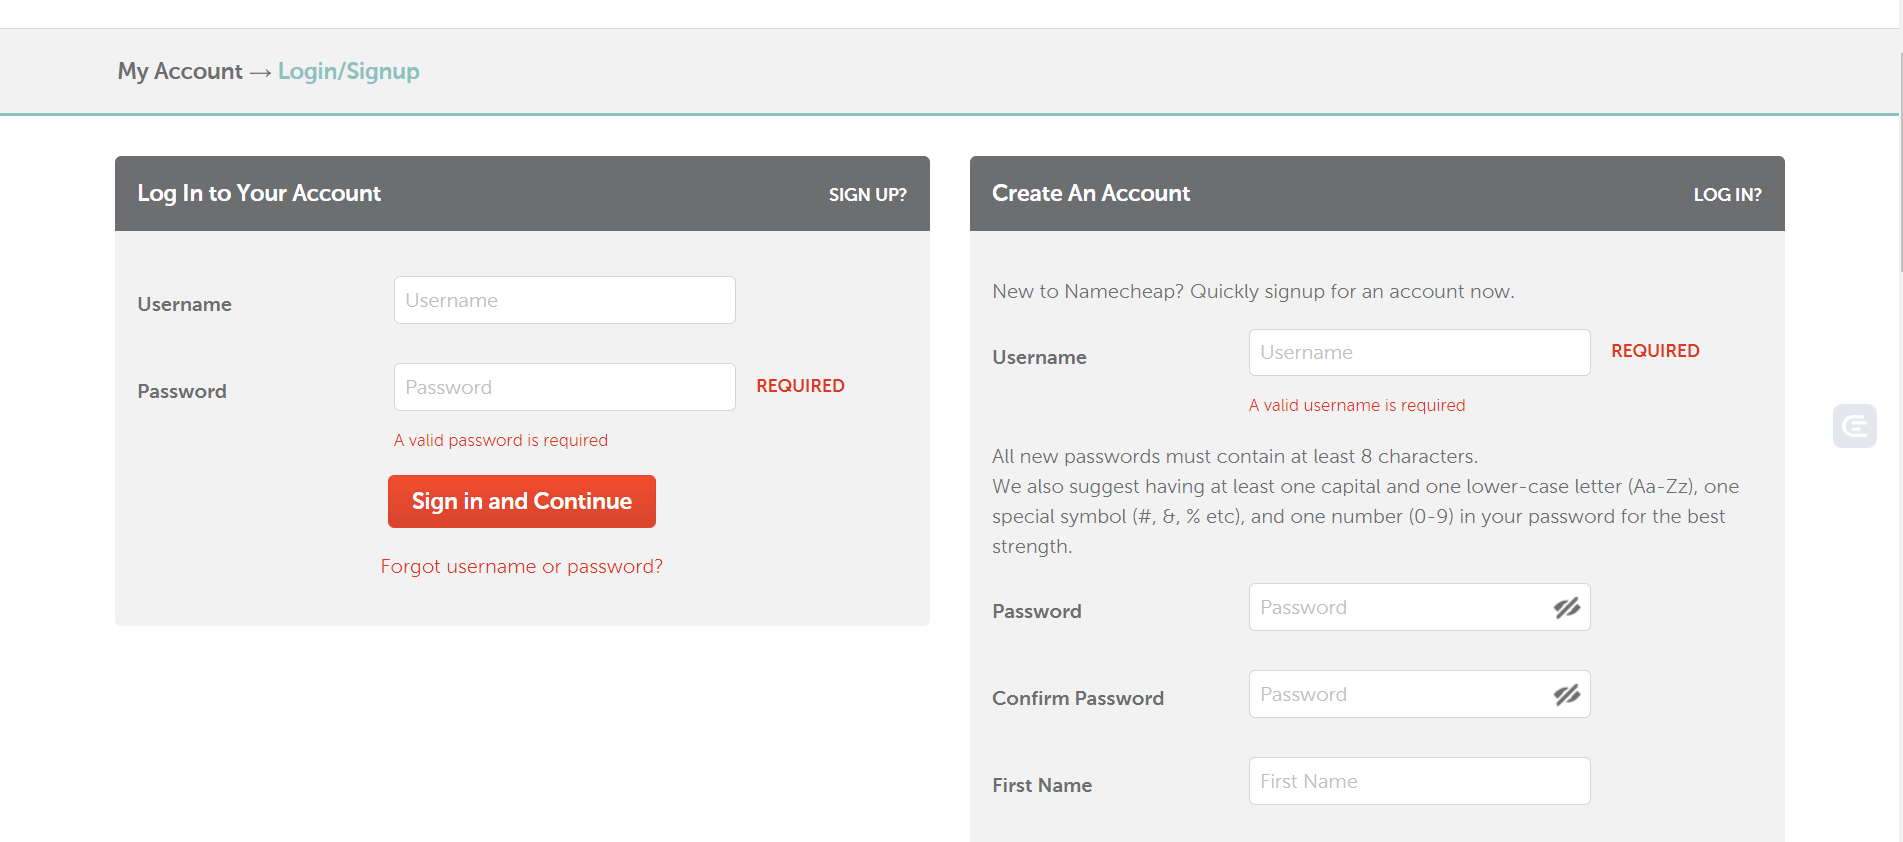
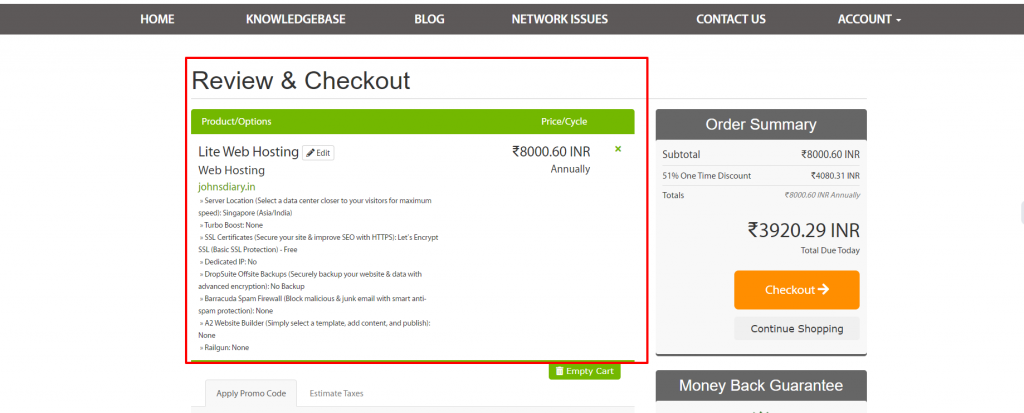
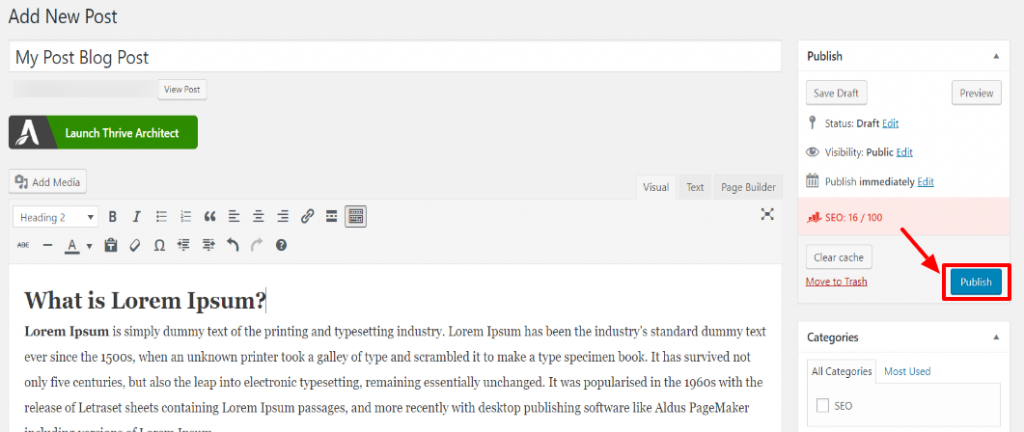
Once you registered your account details with NameCheap, confirm the order like showed in the screenshot.

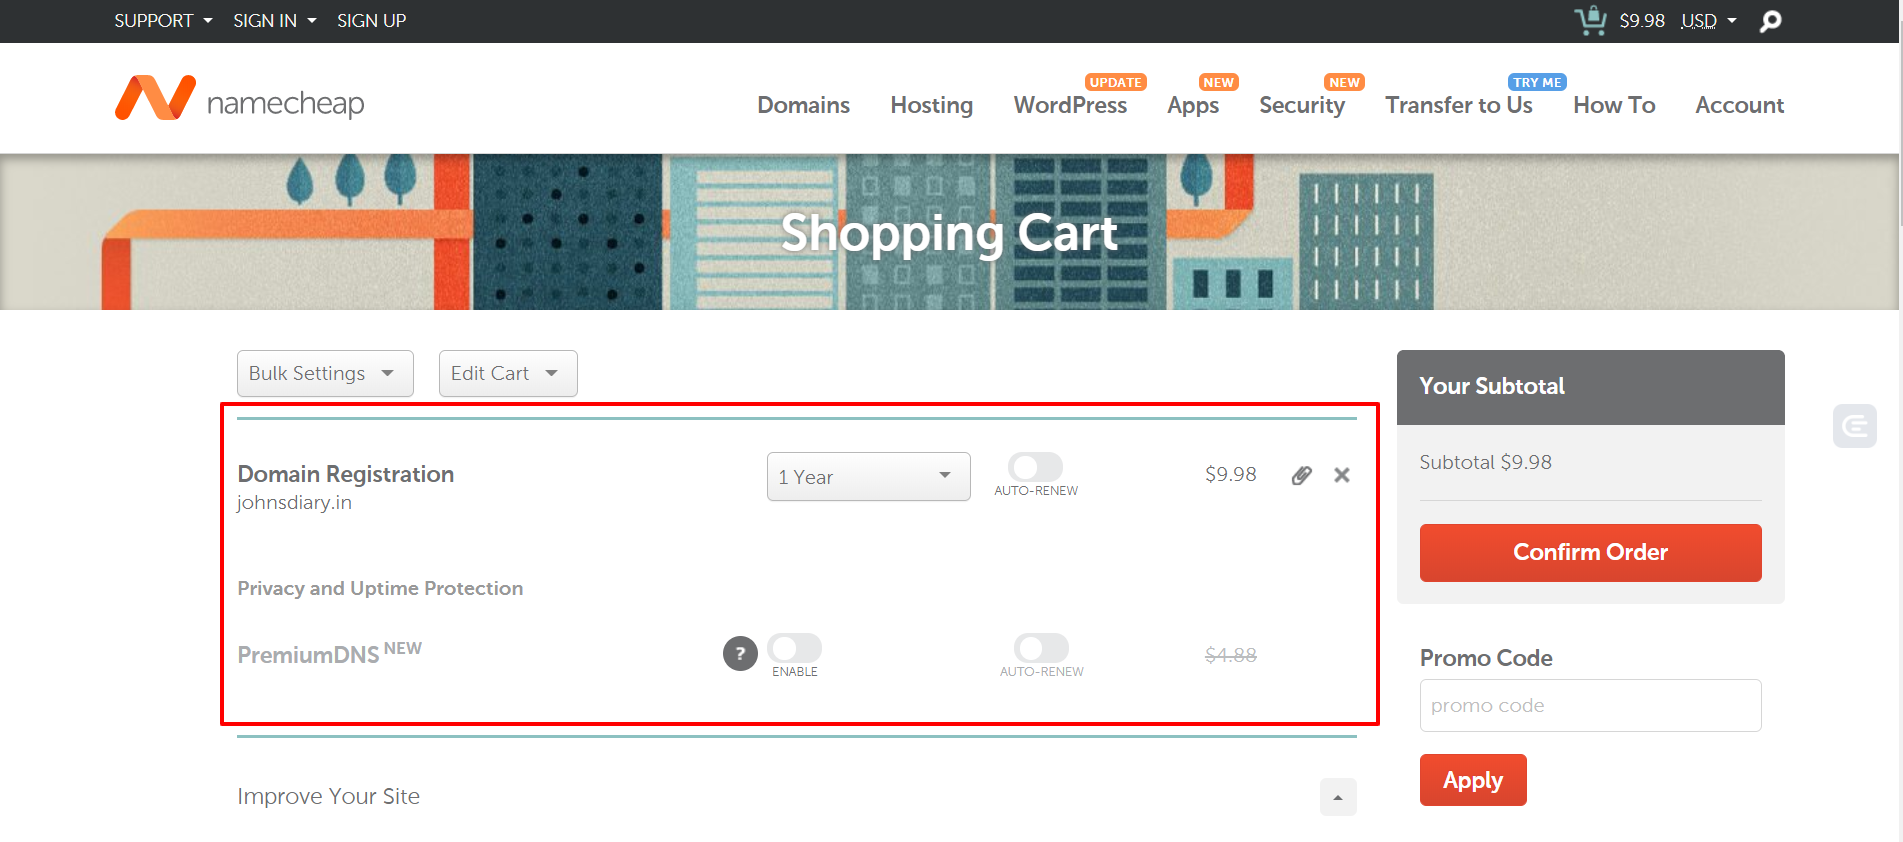
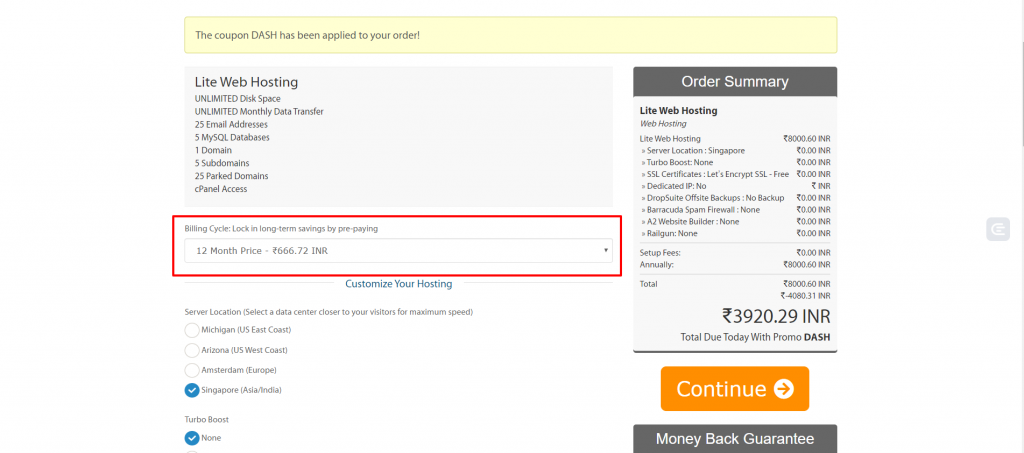
When you are confirming the order, it will ask for your payment details to buy your domain. 

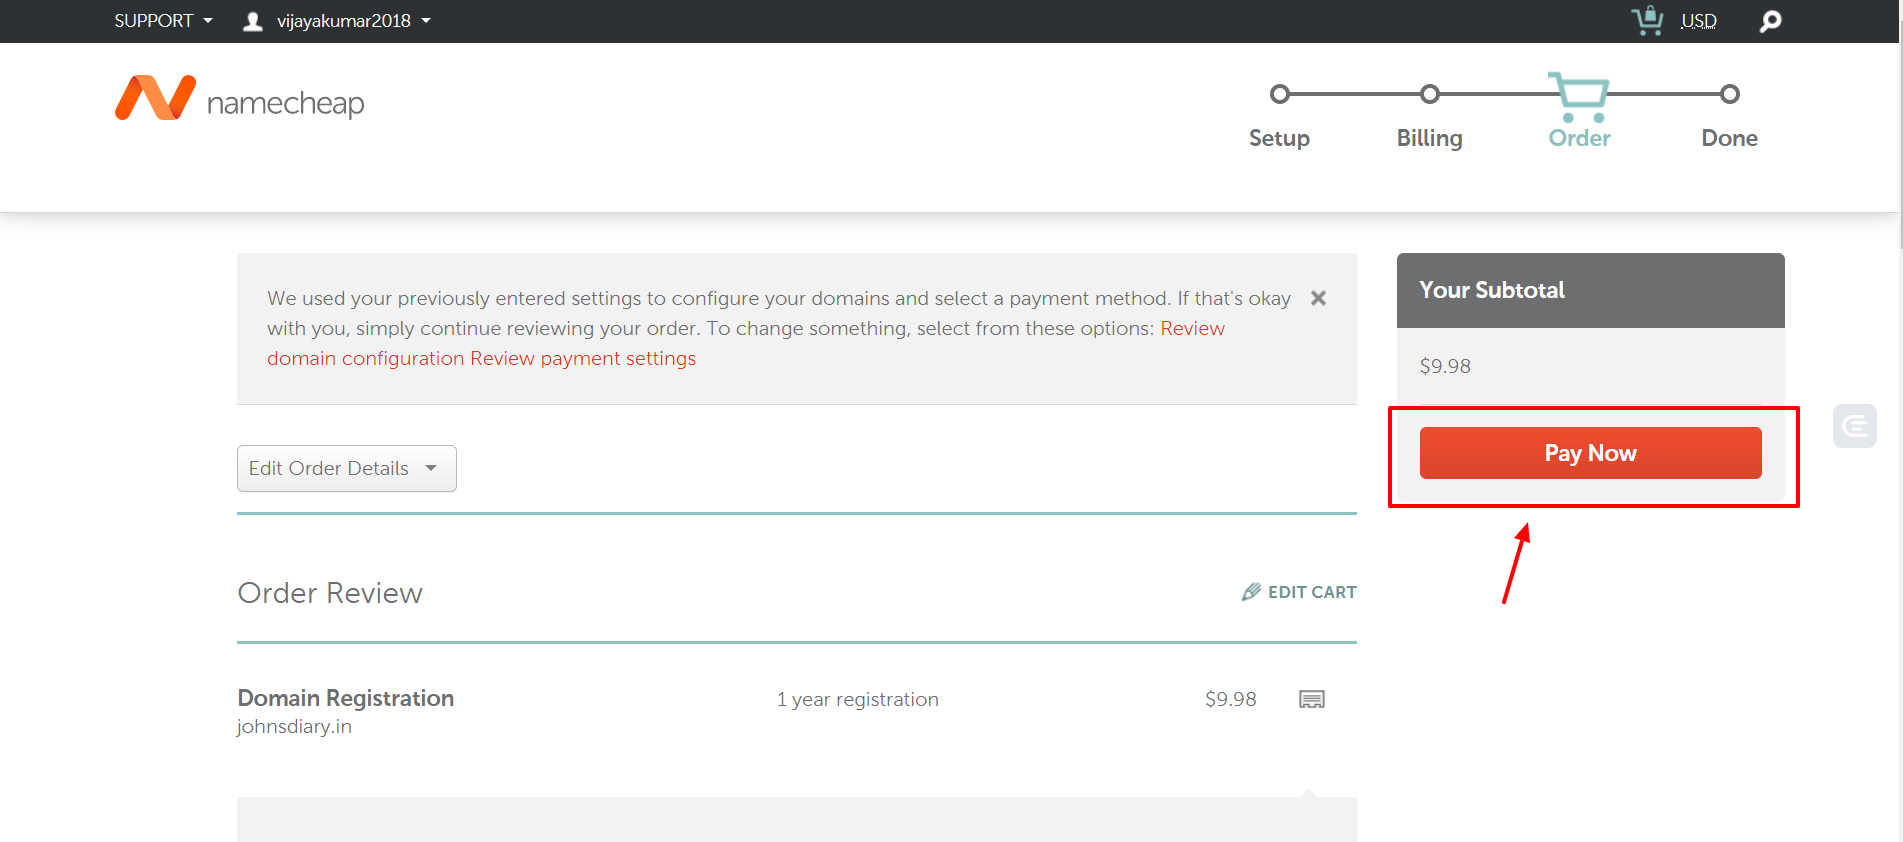
Once you finish with all account details entered. Enter the Pay Now option to get started.

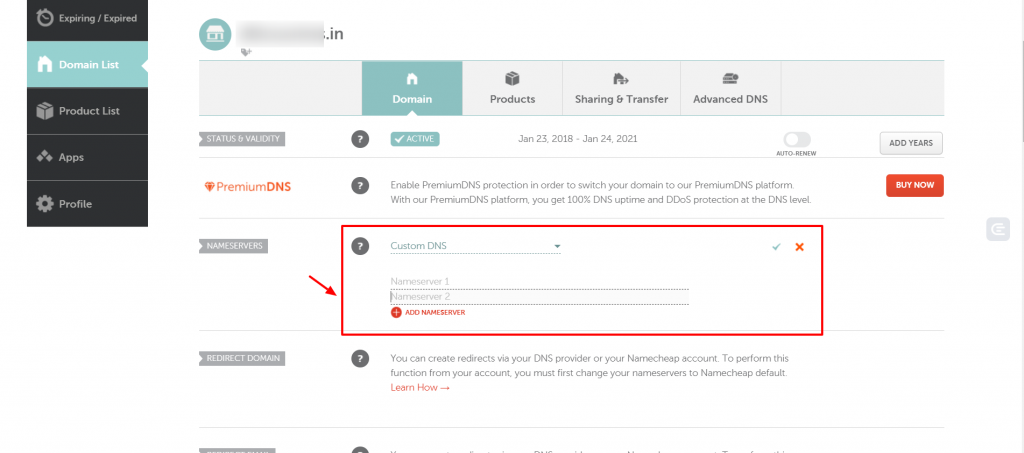
Once you are done with all the above steps, you should point your domain with your hosting. For this, follow the instructions from Step 2.

Step 2. Get a Web Hosting Account

web hosting

The next important step on how to start a blog in India is getting a hosting account. You may be wondering why you need a web hosting platform when you’ve already gotten a domain to start a blog in India.

The answer to that question is that both are important to blog, and both are not the same thing. Web hosting services are entirely different from domains, and the two get mixed up very often by people who are newly creating a website or a blog.

You must know the difference between the two since you’ll need both to start a blog in India and get it up and running. 

Domains are like an address for your website. For the people who want to come to your house, you will give them the address so that they can navigate and find it. A domain serves the same purpose.

A web host is a structure that supports your house and everything in it. It stores and “hosts” all your website files so that people can view it when they visit your website or blog.

These are the main differences between domains and web hosting. And you cannot run a blog or website without these two. Now that you know the difference, we can take a look at which web hosting service provider you should use.

1. Why We Recommending A2 Hosting:

We are highly recommending A2 Hosting as your service provider, primarily if you are in India. It offers fast and friendly web hosting offers and services as well as domain services for websites and free Blogs in India. 

A2 Hosting

It has been providing services since 2001 to over millions of websites and blogs. They also offer specified types of hosting, such as VPS hosting, reseller hosting, and so on. They are also providing a host for WordPress, Drupal, Joomla, and other free blogging platforms that you would wish to use.

2. Choose Best Hosting for a Blog:

The cheapest and best plan from A2 Hosting that you can use the shared plan, which costs 286.77 rupees per month. With this plan, host your website or blog on WordPress, Drupal, or any other blog hosting site.

Follow the below steps to buy A2 Hosting.

Step 1: Go to A2 Hosting and choose Shared Hosting Plan to Get Started.

Shared Hosting

Step 2: Here, you can see three different options based on your need.

For example, if you require to host a single website choose LITE Plan, else you own to host multiple domains, then you have two options SWIFT & TURBO.

Shared Hosting Plans

Step 3: Once you chose the LITE plan, enter your domain to register, or in any case, you own your domain already, select the 3rd option(I will use my existing domain and update my nameservers), then proceed.

Cont, enter the existing domain and continue.

Step 4: Here, registered your account to purchase, fill all necessary details, and create an account.

Step 5: Once You are done with the signup, there is an option to choose a billing cycle by 1 Month, 12 Months, 24 Months & 36 Months. Select the choice based on your criteria.

Note: Coupons will be applied when clicking this link.

Step 6: Select Data Center Location to Singapore and Continue to Checkout

Step 7: Review all details and proceed to continue.

Step 8: Enter the Account and Card Details to Checkout.

Step 9: Yes, Done with all actions. Point your Name Servers into Domain Register. Add name servers, like shown in the screenshot below.

Continue reading on how to install WordPress on your blog. 

Some of the essential features of this plan, 

  1. 99.9% uptime commitment, 
  2. automated server rewind backups,
  3. a free SSL certificate from Lets Encrypt and
  4. anytime money-back guarantees.

Free SSL certificate is vital since it enables better security.

For a starting plan, these features are significant and can help. If you wish to go for the highest plan, that will cost 7294.82 rupees a month.

Another good thing about A2 Hosting is their value for customer satisfaction. They have an excellent support team that can help you via live chats, calls, and emails.

A web hosting provider with a good support crew is significant, and A2 Hosting has shown how much they value their customers by being available for all support services round the clock every day. 

Now you own a web hosting, and the next step is to start a blog in India using WordPress. 

Step 3. How to Start a Blog in India using WordPress

The next step to start a blog after getting a web hosting service provider is to install WordPress.

Before installing it, you should know the difference between wordpress.com and wordpress.org.

Select a WordPress theme to design your blog

We are highly recommending WordPress as the blogging platform since it is straightforward and easy to use. We’ll give you a little background as to why we recommend you get your Blog on WordPress here below. And how to start a blog in India for free and make money through it.

1. Why WordPress? 

WordPress first showed up on the Internet in 2003. Since then, it has been in operation helping various companies, Bloggers, Influencers and content creators publish their blogs and articles on the Internet either for free or at reasonable costs.

Source: https://trends.builtwith.com/cms/blog/country/India

It offers excellent security and services that can enable you to start a blog in just a few easy steps. That is why most content creators and bloggers tend to use or recommend for blogging.

It’s so simple to use that even a beginner with absolutely no experience can quickly learn how to use it in a matter of days if not hours. So it is not a big deal to learn how to make money blogging for beginners in India.

2. How to set up a WordPress Blog? 

The first thing you need to do to start a blog and start blogging is to register your domain. If you own a web hosting account and an email address, to quickly get started.

We recommended A2 Hosting since it also has WordPress hosting services, meaning instead of having a separate WordPress account, By just sign up straight from A2 Hosting and register your domain.

After registering your domain, get to work on your articles and blog posts. 

Be sure to choose either a free or a paid plan. For free blogs, you don’t need a paid plan, but if you plan on making money and not hosting a free blog, paid plans are the best.

Installing WordPress using Softaculous is one of the simplest methods than any other manual installation. If you have difficulty setting up a blog, easily ask the customer support team for any queries. 

They are available round the clock and approach them for any queries related to the setting up and maintenance of blogs and to know about how to write a blog and earn money in India.

Things to Trust:

  • Dedication to customer satisfaction and their customer support team shows this by working round the clock, every day, to help users with their blogs and websites.
  • Live chat with them, call them, or email them, depending on what is comfortable with you.

The next thing to do to start a blog in India is to choose a theme for your blog. There are a lot of choices for themes and customize them to your preferences regarding a blog.

Get themes on WordPress itself or get a variety of themes from various free WordPress theme sites on the Internet.

We strongly suggest that, get themes directly from WordPress or customize any existing themes available in India to suit the needs of a blog. 

We’ll explain how to choose the right WordPress theme for your blog in the next section.

Also check out must have WordPress Plugins for WordPress – https://boobalan.me/blog/wordpress-plugins-for-bloggers/

3. WordPress Setup Basics 

WordPress is the most sought-after options to set up an alluring looking website in no time. WordPress comes with zero costings, and it can be used to create business websites, brand pages, portfolios, and even personal blogs. WordPress is the most simple and effortless option and used as the best content management system, free of cost. 

WordPress is open-source and can be used by anyone and anytime. By making small changes, you are good to create a unique and amazing looking website. WordPress works as a tool to manage the important part of the website, which is the content. 

You can get started without any knowledge of coding or programming with WordPress. The best part is, the website build in WordPress is accessible to everyone.

  • WWW or without WWW 

    This is one of the basic aspects; you can go with a WWW website or without WWW. The difference is slight, and that too is technical because WWW works as a hostname, helping the DNS.

    You can create multiple subdomains and restrict the use of cookies. At the same time, a domain without WWW does not come with such inbuilt advantages.  

    Be it WWW or without WWW, it is a personal preference, and it does not matter much. The only fact is, you should not change the URL or remove WWW in the future.

  • SSL

    The most common reason for having SSL is to safeguard the sensitive information sent across the internet.  SSL ensures the information sent across from one computer to another is encrypted and reaches safely to the destination server. 

    SSL is crucial to protect critical customer data like credit card information, password, address, etc. It enhances data security and makes transit from server to browser smooth.

    In addition to it, the SSL certificate also protects the websites from Google warning. Google has a motto to make the internet a safer place, and if your website does not have SSL protocol, then safety is surely compromised. The security warning from google increases if the site is not https.

  • Setup Home Page (Blog Vs. Static Page)

    As we discussed earlier, WordPress is one of the easiest and simplest option to create engaging content for your website. It can be used to create a home page, static posts, and even blog posts.

    Many WordPress users prefer an amazing static front page to grab quick audience attention. This static front page usually has welcoming information and briefly introduces the business, brand, or individual.

    Blog Page: This usually is a traditional layout and the blog page display list of your recent blog posts. The layout matches your theme, and it showcases the multiple recent blog work done by you. The static page lets you have a separate blog page.

    Static Page:  This is the home page or works as the first page of your website. You can add any specific content or information which you want to highlight.
  • Search Engine Visibility Settings

    The search engine works as the biggest source of traffic for a website. The search engine visibility works as the biggest internet-based search engine optimization and tool to manage the website.

    The search engine visibility tool showcases how you can improve both internal and external aspects within your website.  The tweaking can have a positive effect on your website, and you can achieve organic traffic. 

    The search engine is based on the google ranking and algorithms that can be inserted in various elements, including web page, the content of the page, organization methods, attributes, etc.

    you can encourage or discourage Search Engine Visibility; it will affect the indexing of the website. 

    Here are the steps to be done for Search Engine Visibility 

    Step 1:
    Log in with the admin ID and password of your WordPress 
    Step 2: Go to Settings->Readings
    Step 3: Make sure you have checked the option “Search Engine Visibility” or “Encourage Search Engine from Indexing This Site.”
  • Verify Google Search Console and Google Analytics

    It is crucial to verify site ownership. The verification process encourages you to claim that you are the owner of the property.

    To confirm your ownership, you need to verify yourself and need to access the Google search data.  The search console property also needs verified owners.

    Here are the workable steps to be followed to connect Google Search Console to Google Analytics

    Step 1: Log in to the Google Analytics and search for the website which you want to connect with eh Google Search Console.
    Step 2: Go to the Admin option at the lower-left corner and under the property option “Add Products.”
    Step 3: Moving forward, you need to tap on “Link Search Console” under all products.
    Step 4: Tap on Edit and then Add the website under the list. The URL given on both Google Search Console and Google Analytics should be the same.  Choose the property with the same URL and click on Save it. Step 5: You can see the Search Console reports under the option Acquisition » Search Console » Queries.

    Here are the workable steps to be followed to Verify Google Search Console

    Step 1: To start, use the initial step and open Google Search Console and log in using the Gmail ID, which you have used for the Google Analytics of your website.
    Step 2: The next option is to click on the Search Property and then go to Add Property in the drop-down menu option.
    Step 3: Type the website URL in the URL prefix box. Tap on the add button to initiate the process.
    Step 4: If you have added Google Analytics to your site, it will connect with the website.
    Step 5: Tap on: Go to Property,” and here you can see the website as your property.
  • Permalink Structure

    Permanent links are the complete URL for a website or a page; it can have information like a domain name and a slug.  The permanent link should be SEO friendly, and here is how you can create Permalink Structure.

    Step by step guide to change the permalink structure

    Step 1: The initial step is to log in to the WordPress website.
    Step 2: Move to settings -> Permalinks -> Post name and then click save changes.
    Step 3: This tool is used to generate the right code.
    Step 4: The final step is to add the code you generate in the previous step to the website’s .htaccess file. The permalink structure will add more value to the search engine optimization of the website.

  • Sitemap and robot.txt Setup


    The website needs to set up the sitemap and robot.txt to boost the search engine important will ensure your website’s pages are crawls and indexed on Google’s robots.

    The Robots.txt files are situated at the root dietary of your website, and the contents are crawled by Google’s robots to whom permission is given. It is a must to have the file to ensures the bots crawl through all the website pages.


    Here is how you can create a robots.txt file with a sitemap location


    Step 1: The initial step is to locate the sitemap URL. To do so, type the URL in your browser, and you can see the site map. You can also do https://www.xyz.com/sitemap.xml.

    Step 2: Moving forward, locate the robots.txt file, type https://www.xyz.com/robots.txt

    Step 3: Move to add the sitemap location into the robots.txt file; make sure to edit it to robots.txt and include the URL of the sitemap.

  • Install Cache Plugin


    Due to the PHP scripts and coding in WordPress, the page loading speed can be slow; the best solution is Install Cache Plugin.

    It will generate the static HTML files for all the dynamic pages, and the overall side loading speed is fast. The users can experience the best site loading speed, and all this will have a positive effect on google raking.


    Easy and Quick Steps to Install Cache Plugin


    Step 1: Go to the Admin Panel->Plugins and tap Add New.

    Step 2: Enter the “Super Cache” install and activate the plugin.

    Step 3: Enable the plugin and go to the plugin settings page, enable the Caching On.

    Step 4: Update the status and go to the Advanced Tab. Enable PHP to the server cache file.

    Step 5: The next step is to Enable Compress pages to enhance user visibility, update the status, and go to the CDN tab and click on CDN support.

  • Category


    The WordPress categories are the best way to organize posts. It makes navigation easy and provides flexibility. You can organize based on the widgets, menus, and based on your WordPress theme. Here is how you can create the posts.


    Posts -> Categories Page, on the left lower bottom, you get the option to create the categories. Just click on “Add New Category.

  • AMP for Blog


    The AMP is known as the accelerated mobile page; these features make sure your blog post, WordPress page is compatible on mobile and opens at is the best speed.

    With you have not enabled AMP for the blog, the visitor will get a deconstructed view of the website, and the bounce rate also will be high.

    Here is how you can get AMP for Blog


    Step 1: Install the AMP plugin.

    Step 2: Configure the plugin in, automatically the “posts” is enabled.

    Step 3: Based on the device, you can customize until you find the exact match of your blog post size.


    Setting up a WordPress website is a hassle-free; all you need is to take care of the pointers mentioned earlier.

Step 4. Select a WordPress theme to design a blog

The next step to start a blog is that aside from writing meaningful content, you also need your blog to look attractive and catchy to people. You can do that using themes.

WordPress Themes

1. Setup WordPress Theme:

A theme is a blog layout that is responsible for the entire design of the blog you are running. These themes not only give the blog an aesthetic appeal but also make sure that it is responsive and comfortable for your visitors.

Here, we’ll show you how to install themes in WordPress, how to change the blog’s theme, and how to find appropriate themes for a blog. 

To begin with, changing a blog default theme, you need to click on the Appearance tab located on the left-hand side menu.

Appearance

After clicking on it, you will see plenty of options below. They’ll have names such as Twenty Fifteen, Twenty Sixteen, and so on along with images.

WordPress Basic Themes

Those are pre-installed WordPress themes that you can use. If you don’t have a pre-designed theme that you want to use, use one of those themes until you have yourself a design that you would like.

Many other bloggers in India use them and sometimes continue to use them since they are aesthetically pleasing and well functioning.

In case you want to use a pre-installed theme from WordPress’ directory, all you have to do is keep your cursor over the theme you want and then click the Activate button.

Activate theme

After that, your blog will immediately have the theme you want, all with just one click of the mouse.

If you have another theme that you want to install, all you need to do is go to the Appearance tab and then click on Add New Theme. Click on Upload Theme and upload your theme onto the theme directory.

upload theme

Place your cursor over that theme and then click Install. After installation, click Activate, and soon enough, you’ll have your dream theme.

Before choosing your theme or coming up with a theme to use, you need to keep in mind two things when either choosing or designing your theme. 

Aesthetics and Functionality:

You ideally would need a theme that scores high in both categories to get more visitors. Visitors are more likely to use or visit a website or blog that is easy for them to use and view.

So a theme that can be very responsive yet aesthetically pleasing with a good design is essential for running a successful blog. If you happen to be choosing or designing a theme, please keep these in mind before activating the theme.

Now that you have a WordPress theme for a blog, all you have to do now is start blogging your content and publish it. 

In the next section, we’ll give you tips on how to use your WordPress dashboard to write content and publish it as well. The steps are relatively simple and learn within just a matter of minutes. 

It may seem abrupt at first, but as you keep posting regularly, you’ll soon get the hang of it. Learn all about the publishing tools you will need to make your blog fun and entertaining for readers and visitors right down below.

Step 5. Write Content and Earn Money through Blogging

The next step to start a blog is to create a blog post, writing content, and publishing it to earn money or for fun (depending on your choices). 

Check out this post for Top 10 Bloggers in India, based on popularity and by their revenue.

Creating a blog post is simple enough. Navigate to the menu on the left and click on Posts.

earn money through blog

1. How to Create First Blog Post:

You will see a default post in your Posts list. If you don’t want it, you can just click Trash underneath that post and delete it.

Click on the Add New link to add a new post after which, It will redirect you to the post editor screen.

add new post

Add your title in the top box and then start writing your content in the box below it.

If you want to add pictures to your post, click on the Add Image icon, and then using the Upload option, you can upload a photo from your desktop or laptop.

Edit the photo and then click on Insert into Post to add the image to a blog post.

use images

Also, add GIFs and videos if you want. It’s usually a good idea to add videos and images to your blog post since visual content is useful for adding attractiveness to a post. 

They can also help your readers understand your content better or relate to it better.

Once you are done with the post, click on the Publish button, which is on the top right side of your screen to publish your post.

Publish Button

2. Methods to Promote a Blog:

Through the above steps, we learned how to start a blog in India, and now let’s see how to make money through blogging, you need to get it seen by people online. There is no easy way to build a following, but if you start working towards that, you will see progress within a few months or a year.

You just need to be consistent with your content quality. The best way to do this is to promote a blog.

  1. You can start by first telling your loved ones and asking them to read and promote your stuff.
  2. Also, make use of social media by posting updates and links to a blog. 
  3. SEO (Search Engine Optimization) is also a great way to get a blog seen by others on the Internet.
  4. Commenting on others’ blogs, engaging with your readers, and collaborating with other bloggers and content creators are different great ways of building your following. When you leave a reply, visitors will see that you are genuine and will come back to visit your free blog. 

After implementing all these, your blog will soon become popular.

3. Methods to Earn money from a blog:

That’s when advertisers might start knocking at your door, asking you to advertise.

  1. By Google Adsense: You can work with them and gain money with every CPC (cost per click) by running ads on your blog. Also tie-up with companies and sell products 
  2. Write a blog and earn through Affiliate Marketing.

By blogging on a free blog and using affiliate marketing, you can create a massive audience in India and make money blogging.

Adsense is a great place to get started with that. Some people will get memberships to see exclusive content. If you can create that content and publish it for them and get them to sign up for more, quickly earn quite a bit of money from your blog.

To Win Affiliate Marketing and Earn Money:

If you don’t have any idea about what affiliate marketing is and how it works in earning millions, here comes the basic definition of affiliate marketing.  


Affiliate marketing is the process of promoting a particular product and getting the commission for every sale, which is happening through your recommendation/promotion for a product. 

Affiliate marketing helps you to get passive income. But you should do the initial steps with full dedication. Based on your hard work, you will get a passive income higher. All you need is a lot of patience because building trust among customers is essential to make them buy because of your recommendation.


How does affiliate marketing work?

It is not a big deal to start Affiliate marketing, but if you want to earn more, it is necessary to know about its process. So here, I want to list out four steps that help you to understand the process of how affiliate marketing works.


4 Steps to achieve affiliate marketing:

  •  Join affiliate marketing programs:

       Based on your customer’s interest, we have several affiliate programs, but you need to choose among them. Some of them are

  1. HubSpot
  2. Amazon
  3. eBay
  4. Wix
  5. Target and more


  • Choose a product:

You have to choose the best product which you can think of to promote. After finalization of the product which you want to promote, receive an affiliate link.

  • Share the link:

After getting an affiliate link, share that link on your website, which helps the user to navigate into the particular page where the user can buy the product.


  • Product sale:

When a user reads the blog, if he wants to purchase the product based on your recommendation on the website, he can click the link and navigate to the particular product selling page. 


After the purchase of the product, you will receive your commission for that particular sale from that respective company.

3. Benefits of the affiliate marketing model:

Less Responsibility:

Affiliates don’t need to take responsibilities such as developing, supporting, or fulfilling the offer. They need to recommend the product, convince customers, and build trust among customers who are all the things anyone can do only with the experience in the field.

Zero Investment:

Affiliate marketing does not demand any investments as you don’t need to spend any money to join affiliate programs. So I can say here your significant investment in your time and effort in building up potential customers.

Earn more:

Like any other business, you don’t need any additional support to achieve the target. You can set your limit and work on it without any external help. There are no boundaries or thresholds for your earnings as you can develop your promotion for various products, you will be paid.

4. How to find affiliate programs:

Choosing your first affiliate program:

First should always be the best to get the attention of the respective audiences and reach your goal faster. We can apply this formula in any other business, not only for affiliate marketing. So in this section, we want to tell you about the factors you need to consider for sure while choosing your first affiliate program.

  • Read customer’s mind:

The product should grab the attention of the customer. So it would help if you chose based on the user’s interest. They find it valuable to busy the product. Building this mentality among your customers is not only useful for that particular sale but also drives them to purchase more based on your recommendations.

  • Be an expert:

If you choose the product which is more related to your blog, that is, you are an expert in that particular boundary, it can help you to promote that product better.

For example, if you are a technical blogger, you can’t suggest that your customer buy household products. It will not make any sense.

  • Choose the right platform:

Promoting your product in the right platform is more important to reach the right audiences soon. If you are promoting textiles such as kurtas, sarees it could be better to promote on Instagram or Facebook as these are image-heavy products.

On the other hand, If you are promoting any application or software, it is better to promote it through youtube or blog to convert more audience.

5. Promoting affiliate offers:

  • Earn Trust:

Trust is the crucial factor in making your audiences act upon your recommendations. You can follow the steps below, which helps you to build trust among your customers. They are

  • Promote the product which you used personally
  • Maintain the quality of your review
  • It can be better if you are an expert in that particular thing
  • Recommend the product which is related to that specific blog
  • Limit the number of affiliates you promote
  • Contact experts:

The other best way to give a review is based on interviewing the people who used the product. Otherwise, you can know about the product better based on interviewing the person who sells it. It helps to educate the in-depth knowledge about the product to the customers.

  • Create a product tutorial:

You can concentrate on product tutorials, which provide you with high traffic. By offering videos based on frequently searching results, you can attract more audiences.

  • Offer bonus:

The smart idea to promote a product is offering your books to every customer who made a purchase. It is the oldest idea of promoting a product, but it is considered to be one of the best marketing strategies.

Examples of businesses using affiliate marketing:

Knowing about the companies which earn millions through affiliate marketing can be the inspiration to the freshers who have a passion for affiliate marketing. So we have described two such companies below.

  •  Wirecutter:

 It is the website which promotes gear and gadgets earning revenue in millions says about their review process in The New York Times in 2016.

            Reason for their success:

  • They are providing reviews for the product only after the depth analysis of the product through interviews and testing it by their team.
  • They have journalists, scientists, and researchers in their team for testing and taking interviews.


  • BuzzFeed:

   BuzzFeed Reviews has first started its journey as a gift guide but expanded later as a product review site for various products. 

            Reason for their success:

  • They are providing reviews for the most generalized products based on the customer’s search.
  • They are also giving top picks with three different price tags, which helps customers to pick the best one quickly.
  • Their reviews always provide value to customers. They provide answers to the possible questions which customers have while purchasing a product.

Ready to get started with affiliate marketing?

We have quickly given you a glimpse of affiliate marketing, which you should know before getting into it. Hopefully, it is helpful for you to start your own and reach the distance which you want. Because Affiliate marketing is a low-risk business in which there is no investment. 

So It is boon to the people who don’t want to take risks but earning money or tasting success is more important. If you don’t want to do any trial and error check in your career, affiliate marketing can be the best option.

Conclusion:

Now, we are at the end of the article. We have tried our best to explain how to become a blogger in India and the things you should learn before blogging. To Start a Blog in India takes time, but you should have patience and be consistent with your content in terms of quality and quantity of blogging.

You will not see immediate results, but with time, dedication, and effort in your blogging, you will soon see your blog start to grow and more reasonable opportunities coming your way. 

Always keep yourself well informed about the latest trends (in blogging, your niche, and everything in India and the world) and try to implement new things to keep the readers coming in.

Hurry and start your Blog on WordPress.com for free today!

FAQ:

          Depending upon your goals for starting a blog, the cost may vary. If you are starting a blog just like your hobby, you can go for free of cost platforms. But if you want to do it effectively, it may cost around ₹2000 to ₹2500. To be more precise, you may need 400-600 to buy a domain, and It will cost about 1500 to 2000 to buy a server.

        We have several open-source platforms in the market like “Wix,” “WordPress,” Blogger,” etc. You can use any one of them to start a blog for free of costs. But, Building a blog entirely for free is not a good idea, unless you want to try yourself out as a writer.

 ​Evergreen content blogs:

     These kinds of blogs have a long life span so that they will give you a stable income. It is a bit safe to write evergreen contents as the interests of people will be consistent over these contents.

   E.g., Workout Tips, Parenting Tips, Money saving ideas.

   Trending content blogs:

   Trending content blogs are a bit riskier but can often be less competitive. You can earn more if you find a top trending topic. To do so, You need to do a lot of research to get which is currently on the rise

  E.g., Home improvement, Pantry, Lawn and garden

  1. Let your readers know about yourself and also use keywords such as “The first blog,” Welcome. 
  2. List down the first few week’s blog post topics; You can change it according to that moment when you post a blog.
  3. A smart way is to read blogs that you don’t agree with and start writing a blog in other viewpoints.
  • Build your self-hosted blog 
  • Start publishing reliable and significant content. Research as much as possible before posting it
  • Target is getting organic traffic to your blog, which is the most valuable source of traffic. 
  • It may result in 

a) Convert users to stay longer on your page
b) Subscribe to your newsletters
c) Enquire services
d) Buy your products

           Earning depends upon the blogger’s effort, the topics they choose, and how they deliver it to their users. If all the three are satisfied, then It’s pretty easy to make ₹15000 to ₹20000 per month blogging in your first year. Then obviously, you can earn more in your upcoming years. Glassdoor reports that the average blogger salary is over ₹452,310.54 per year, based on several anonymously submitted salaries.